
%22%20transform%3D%22matrix(2.5%200%200%202.5%201.3%201.3)%22%20fill-opacity%3D%22.5%22%3E%3Cellipse%20fill%3D%22%2325568d%22%20rx%3D%221%22%20ry%3D%221%22%20transform%3D%22matrix(-85.99966%20-36.49321%2019.0631%20-44.92397%20209.6%2095.4)%22%2F%3E%3Cellipse%20fill%3D%22%23dfe4ec%22%20rx%3D%221%22%20ry%3D%221%22%20transform%3D%22matrix(77.1593%20243.04617%20-77.13647%2024.48834%2015%2028.6)%22%2F%3E%3Cellipse%20fill%3D%22%238c7052%22%20cx%3D%22153%22%20cy%3D%2270%22%20rx%3D%2252%22%20ry%3D%2239%22%2F%3E%3Cellipse%20fill%3D%22%233499fe%22%20rx%3D%221%22%20ry%3D%221%22%20transform%3D%22rotate(11.4%20-514.5%201204.3)%20scale(32.25415%2095.20942)%22%2F%3E%3C%2Fg%3E%3C%2Fsvg%3E) Introduction:
Introduction:
 Introduction:
Effective website navigation is a cornerstone of user experience, and dynamic drop-down menus play a pivotal role in achieving this. In this guide, we’ll take you through an in-depth tutorial on creating dynamic drop-down menus in WordPress. Regardless of your expertise level, this step-by-step walkthrough will empower you to customize your site’s navigation, ensuring a seamless and engaging user journey.
Understanding Dynamic Menus in WordPress
Before diving into customization, it’s crucial to understand the concept of dynamic menus in WordPress.
- Log in to Your WordPress Dashboard:
- Access your WordPress admin panel by navigating to your website’s URL followed by “/wp-admin” (e.g., yourwebsite.com/wp-admin).
- Enter your login credentials to access the dashboard.
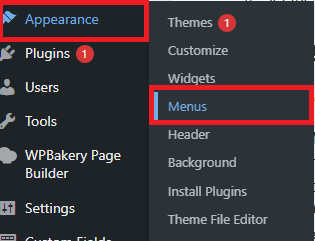
- Navigate to Appearance > Menus:
- Find the “Appearance” option in the left sidebar.
- Click on “Menus” to enter the menu editing interface.
%22%20transform%3D%22translate(.6%20.6)%20scale(1.23047)%22%20fill-opacity%3D%22.5%22%3E%3Cellipse%20fill%3D%22%230b0b0b%22%20rx%3D%221%22%20ry%3D%221%22%20transform%3D%22matrix(-1.62136%20-122.58075%2033.41827%20-.44202%2085.3%20146.4)%22%2F%3E%3Cpath%20fill%3D%22%230f0f0f%22%20d%3D%22M17.2%2077.2l35.2-29.5%2024.4%2029-35.2%2029.6z%22%2F%3E%3Cellipse%20fill%3D%22%23484848%22%20cx%3D%22223%22%20cy%3D%2286%22%20rx%3D%22112%22%20ry%3D%22112%22%2F%3E%3Cellipse%20fill%3D%22%23474747%22%20cx%3D%2228%22%20cy%3D%22133%22%20rx%3D%2236%22%20ry%3D%2236%22%2F%3E%3C%2Fg%3E%3C%2Fsvg%3E) Understanding Dynamic Menus:
Understanding Dynamic Menus:- Learn about the significance of dynamic menus and how they differ from static menus.
- Dynamic menus allow for automatic updates based on changes to your site’s structure, providing flexibility.
 Understanding Dynamic Menus:
Setting Up a Basic Dynamic Menu
Let’s initiate the process by setting up a basic dynamic menu.
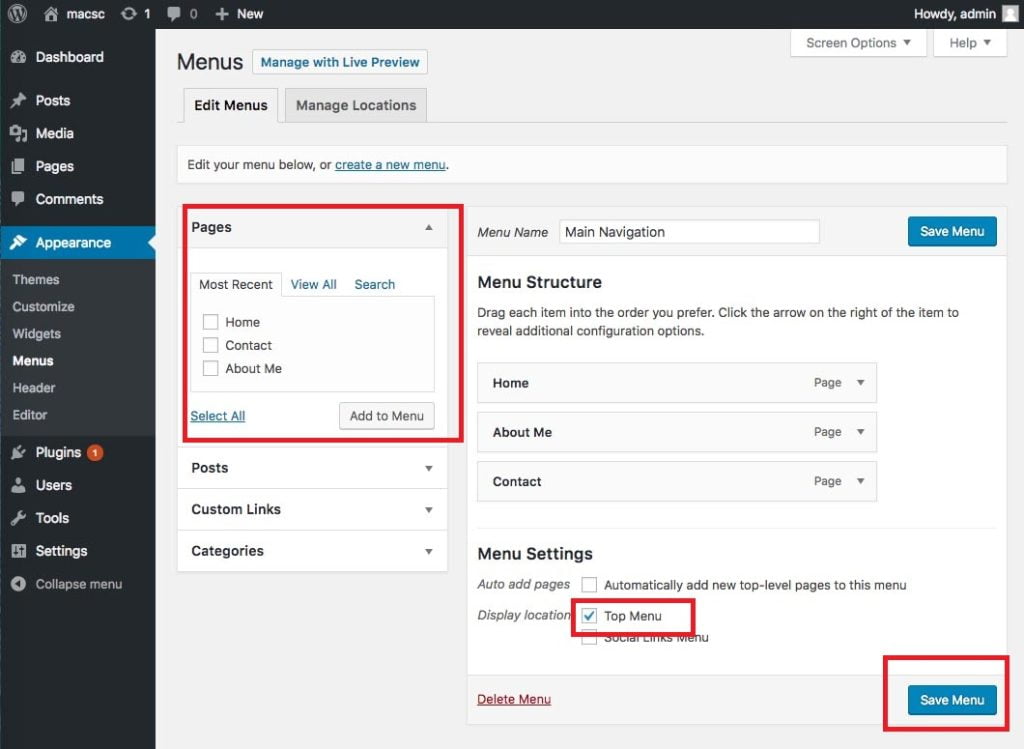
- Create a New Menu:
- Click on the “Create a new menu” link.
- Give your menu a name and click the “Create Menu” button.
- Add Pages to Your Menu:
- Select the pages you want to include in your menu from the left panel.
- Click “Add to Menu” to add them.
- Configure Menu Settings:
- Arrange menu items by dragging and dropping them to the desired order.
- Set the display location for your menu, often located under theme-specific options.
%22%20transform%3D%22matrix(2.5%200%200%202.5%201.3%201.3)%22%20fill-opacity%3D%22.5%22%3E%3Cellipse%20fill%3D%22%23070707%22%20rx%3D%221%22%20ry%3D%221%22%20transform%3D%22matrix(-12.40324%20237.82232%20-32.45516%20-1.69265%2011%2090.1)%22%2F%3E%3Cellipse%20fill%3D%22%23fff%22%20cx%3D%22185%22%20cy%3D%22143%22%20rx%3D%22128%22%20ry%3D%22128%22%2F%3E%3Cellipse%20fill%3D%22%239f9f9f%22%20rx%3D%221%22%20ry%3D%221%22%20transform%3D%22matrix(5.65767%20-180.03012%2016.60894%20.52196%2042.9%2070.5)%22%2F%3E%3Cellipse%20fill%3D%22%23fff%22%20rx%3D%221%22%20ry%3D%221%22%20transform%3D%22matrix(-87.12407%2037.19538%20-24.65205%20-57.74338%20165.5%20123)%22%2F%3E%3C%2Fg%3E%3C%2Fsvg%3E) Customizing Dropdown Navigation
Customizing Dropdown Navigation
 Customizing Dropdown Navigation
Now, let’s delve into customizing the appearance of your dropdown navigation.
- Access the Menu Customizer:
- Click on the “Manage Locations” tab.
- Select the menu you’ve created and assigned it to the desired location.
- Customize Appearance:
- Explore customization options such as font styles, colors, and spacing.
- Adjust these settings to ensure your menu aligns with your website’s overall design.
Responsive Design for Dropdown Menus
In the age of mobile browsing, optimizing for responsiveness is crucial.
- Integrate CSS for Responsive Design:
- Access the theme editor or use a custom CSS plugin.
- Implement CSS code and media queries to adjust the menu for different screen sizes.
Creating Nested Menus for Deeper Navigation
Enhance your menu’s organization with nested dropdowns.
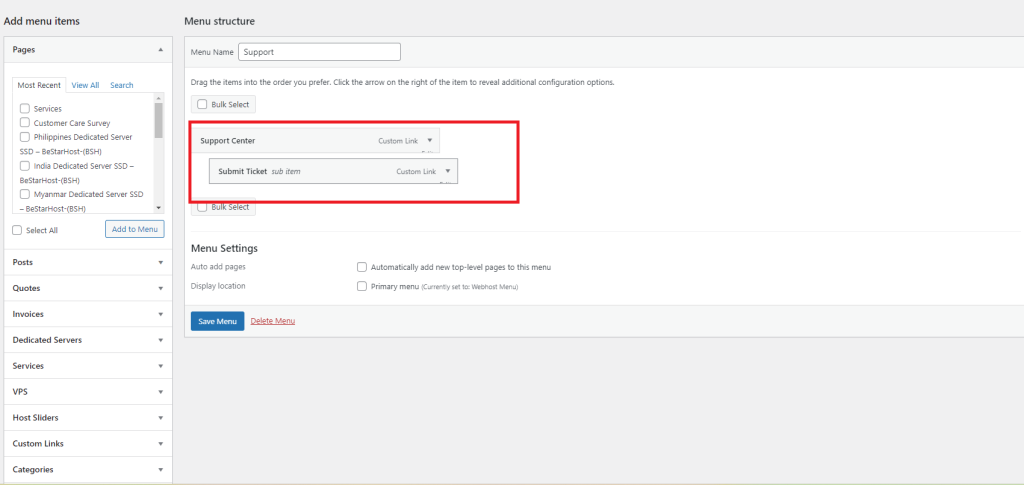
- Add Sub-Items:
- Within the menu editor, drag a menu item slightly to the right beneath another.
- This creates a nested, or sub-item.
- Configure Sub-Item Settings:
- Fine-tune the settings for sub-items, such as adjusting their order and visibility.
%22%20transform%3D%22matrix(2.5%200%200%202.5%201.3%201.3)%22%20fill%3D%22%23fff%22%20fill-opacity%3D%22.5%22%3E%3Cellipse%20cx%3D%2251%22%20cy%3D%2246%22%20rx%3D%2213%22%20ry%3D%2213%22%2F%3E%3Cpath%20d%3D%22M153%2021h9v33h-9z%22%2F%3E%3Cellipse%20rx%3D%221%22%20ry%3D%221%22%20transform%3D%22rotate(51.8%20124%20258.3)%20scale(28.90066%2010.64082)%22%2F%3E%3Cpath%20d%3D%22M206%209.1l5.5-3.2L163.3-16l52.3%2025.3z%22%2F%3E%3C%2Fg%3E%3C%2Fsvg%3E)
- Fine-tune the settings for sub-items, such as adjusting their order and visibility.
Conclusion
Congratulations! By following these step-by-step instructions, you’ve successfully created and customized dynamic drop-down menus in WordPress. Your website’s navigation is now not only functional but tailored to provide an optimal user experience. Experiment with these newfound skills and witness the positive impact on your site’s usability.